Tag: Tokugawa Clan

  • The Third Unifier – Tokugawa Ieyasu. Part Two.

    The Third Unifier – Tokugawa Ieyasu. Part Two.

    The Battle of Okehazama in 1560 saw Tokugawa Ieyasu’s masters, the Imagawa, dealt a serious blow at the hands of Oda Nobunaga. In the aftermath, Ieyasu began asserting his independence, and in 1562, the so-called “Kiyosu Alliance” between Ieyasu and Nobunaga was formalised.

    The mon of the Tokugawa.
    百楽兎 – 投稿者自身による著作物, CC 表示-継承 3.0, https://commons.wikimedia.org/w/index.php?curid=1056853による

    The Imagawa, however, were down, but not out, and Ieyasu’s position was far from secure, despite his new alliance. In 1563, the “Mikawa Ikko-Ikki” Rebellion broke out, and in early 1564, when the Imagawa announced their intention to crush Ieyasu, several of his vassals in Mikawa switched sides, joining the Ikko-Ikki or else rising against Ieyasu in anticipation of an Imagawa attack.

    The name “Ikko-Ikki” suggests that the uprising was similar to other religiously motivated risings that occurred throughout Japan during this period. Indeed, the focal point seems to have been several temples in Mikawa; however, some scholars now suggest that the uprising was motivated more by economic reasons, and some even go so far as to say that Ieyasu may have provoked the rising, or at least took advantage of it to cement his control of Mikawa Province.

    A later depiction of the Battle of Azukizaka. Ieyasu is the figure on the white horse on the right.

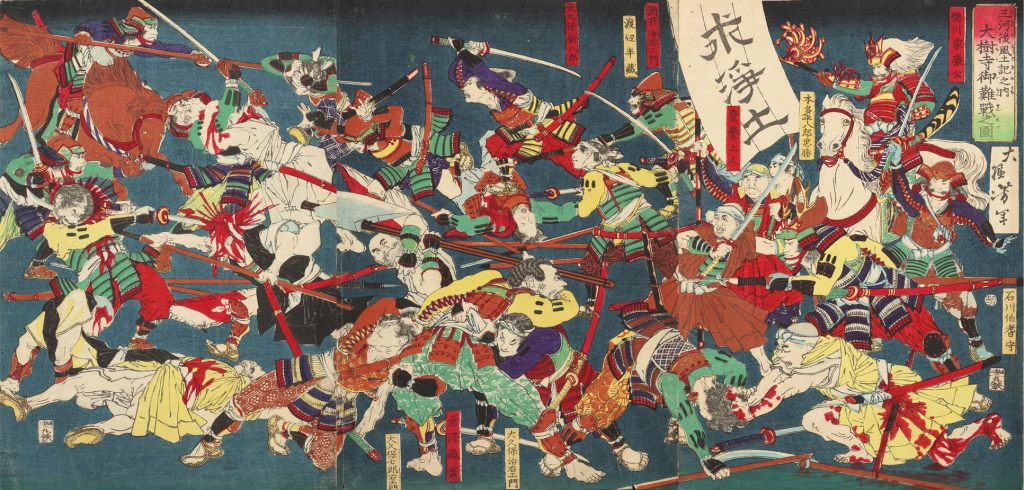
    While it’s impossible to know for sure, Ieyasu did much to boost his own reputation in putting down the rebellion. At the Battle of Azukizaka (sometimes called the Battle of Batogahara) in January 1564, Ieyasu led his forces in crushing the rebels, despite ferocious fighting. The story goes that Ieyasu charged the enemy fearlessly, and came under heavy gunfire, with several rounds penetrating his armour, but leaving him uninjured, inspiring his men, and leading some rebels to switch sides.

    In the aftermath, Ieyasu banned the Jodo Shinshu sect of Buddhism in Mikawa, only to lift the ban in 1567, just a few years later, lending credence to the argument that the fighting had never been about religious issues but about political control of the province.

    The Honshuji Temple, one of the focal points of the rebellion, as it appears today.

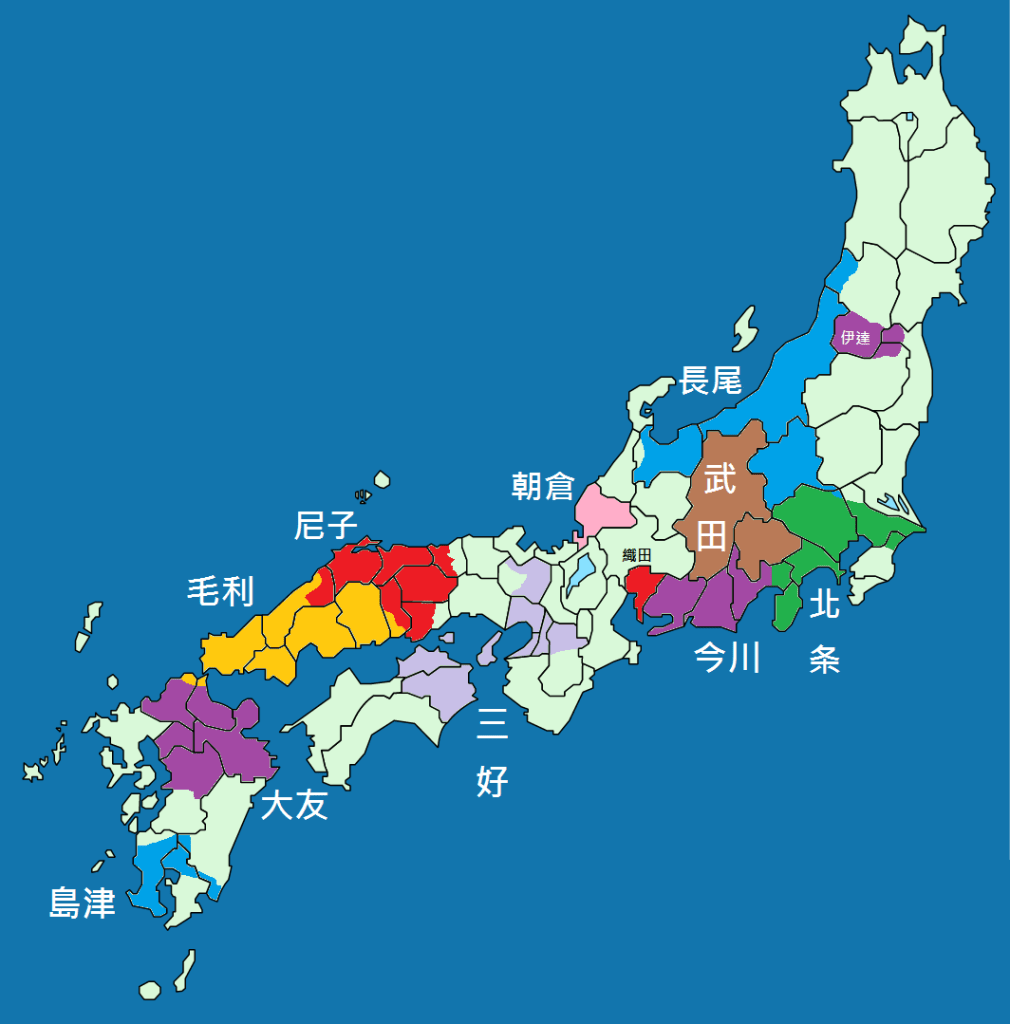
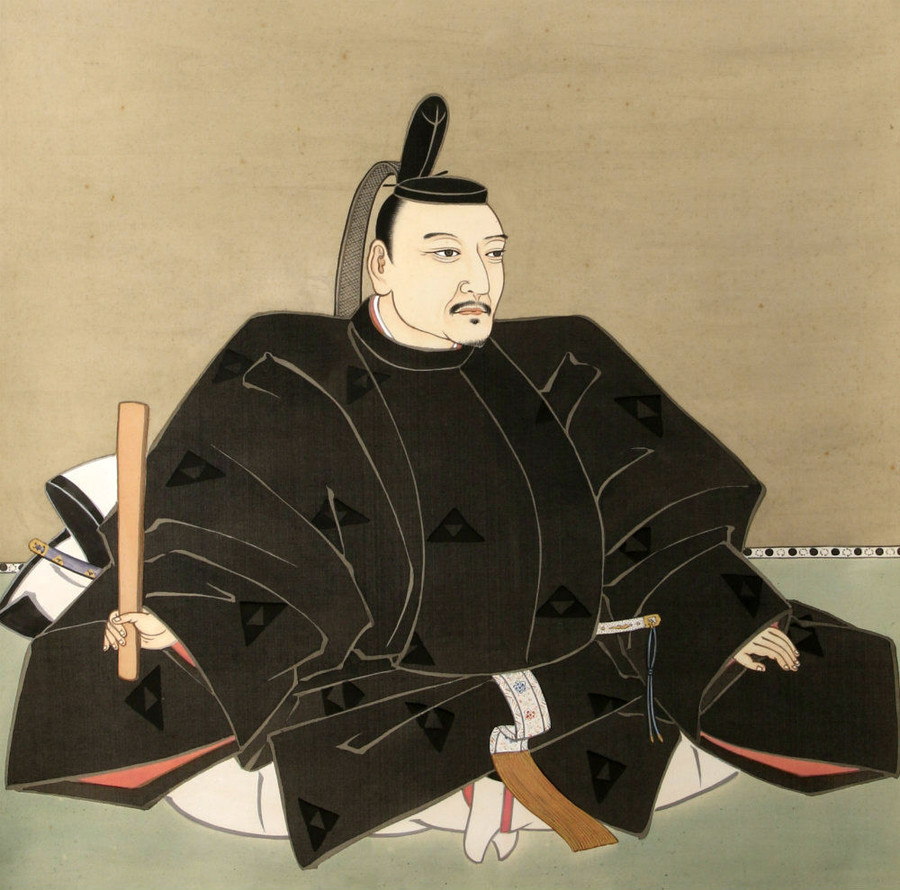
    Before 1566, Ieyasu’s family name was Matsudaira, but around this time, he petitioned the Emperor to change it to Tokugawa. The exact reasons for this are related to the complex (and often impenetrable) genealogies of the Minamoto and Fujiwara Clans, from whom Ieyasu claimed descent. You may remember that Minamoto and Fujiwara were the names of two of Japan’s most ancient and illustrious families, and it was a big deal to claim descent from them.

    This would become much more important later, as only a member of the Minamoto could become Shogun (technically), but that was still decades in the future. At the time, the name change was probably more closely associated with prestige and a desire to assert independence from the Imagawa, with a new name symbolising a new era for the clan.

    Takeda Shingen.

    In 1567, Ieyasu further strengthened his alliance with Nobunaga by marrying his eldest son to Nobunaga’s daughter. However, they were both just nine years old at the time, so the marriage was a political rather than conjugal union. The next year, Ieyasu dispatched forces to support Nobunaga’s march on Kyoto, and in December, he made an alliance with Takeda Shingen and launched a joint invasion of Imagawa territory.

    The attack was a success, but the relationship between Ieyasu and Shingen fell apart almost immediately. According to Tokugawa accounts, it had been agreed that Ieyasu would take Totomi Province, and Shingen would take Suruga. However, it wasn’t long before Takeda forces were also crossing into Totomi, in direct violation of the agreement (which may never have existed to begin with).

    Suruga and Totomi Provinces.
    By Ash_Crow – Own work, based on Image:Provinces of Japan.svg, CC BY 2.5, https://commons.wikimedia.org/w/index.php?curid=1691864

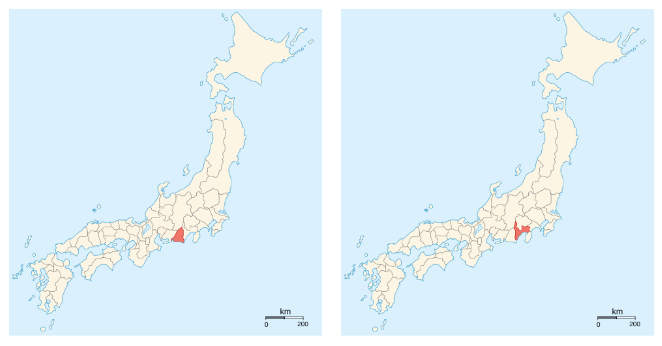
    Ieyasu then sought the support of the Hojo Clan, and their Lord, Ujiyasu, who had his own ambitions for the former Imagawa territory. Together, they successfully pushed the Takeda forces back, and in 1570, Ieyasu moved his base from Okazaki Castle in Mikawa Province to Hikuma, which he promptly renamed Hamamatsu, in Totomi. Later that year, he would further prove his value as an ally of Oda Nobunaga by supporting his campaign against the Azai-Asakura Alliance, fighting in the rearguard in the defeat at Kanegasaki, and then providing important reinforcements at the victorious Battle of Anegawa in July.

    In 1571, the alliance would be sorely tested, as the last Ashikaga Shogun, Yoshiaki, sought to rally forces in opposition to Oda Nobunaga, with the ultimate goal of restoring his family’s position. The Anti-Nobunaga coalition (which was, importantly, not necessarily pro-Ashikaga) included the forces of the Azai-Asakura Alliance, the powerful temple of Ishiyama Honganji, and Takeda Shingen, among others.

    Ashikaga Yoshiaki

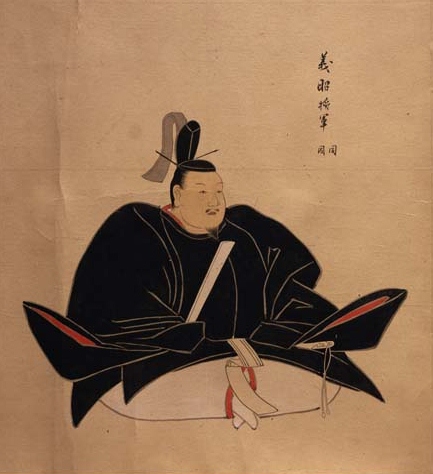
    In the aftermath of the defeat of the Imagawa, Hojo Ujiyasu, who had favoured an alliance with Ieyasu against the Takeda, died and was replaced by his son, Ujimasa, who reversed his clan’s diplomatic position and reestablished the alliance with Shingen. At this point, Yoshikai, seeking to take advantage of the pressure he was now under, sought to gain Ieyasu’s support, offering him the position of Kanrei or deputy Shogun in exchange.

    Ieyasu refused this offer and chose to retain his alliance with Nobunaga; in response, Takeda Shingen launched an invasion of the Mikawa and Totomi Provinces in September 1572. Leading 20,000 troops, Shingen crossed the Aokuzure Pass, and with the help of several defections amongst Ieyasu’s retainers, swiftly gained control of northern Totomi.

    A later depiction of the Takeda Army advancing into Totomi Province.

    Meanwhile, a separate force invaded Nobunaga’s territory in Mino, meaning that when Ieyasu called for aid, none was readily available. Ieyasu was forced into an impossible situation; his forces were heavily outnumbered by the advancing Takeda, and a pitched battle would almost certainly end in defeat. On the other hand, if he retreated or even stayed on the defensive, he faced the prospect of losing support from his retainers, some of whom had already proved they were willing to switch sides.

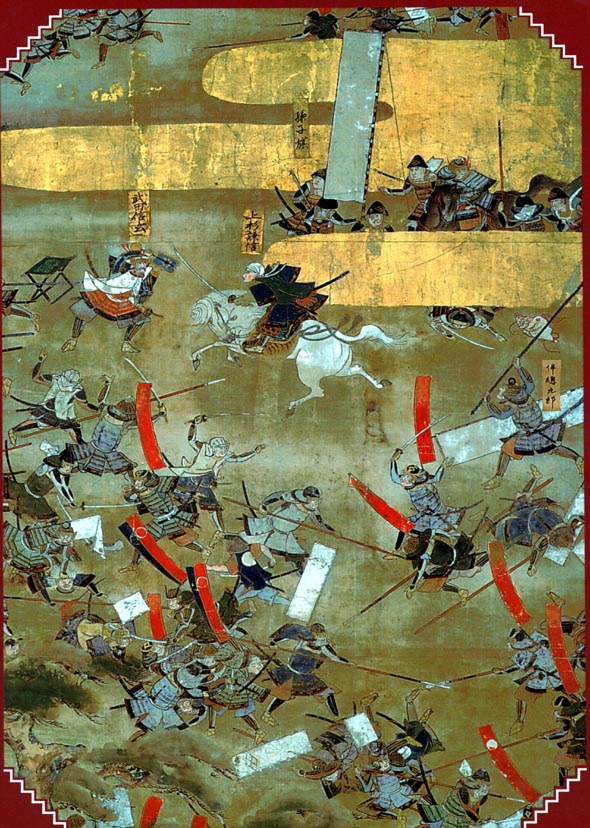
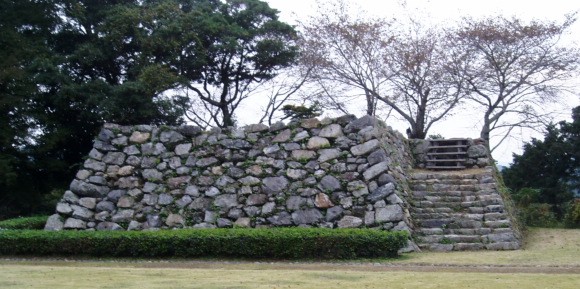
    The Takeda headed towards the strategically important Futamata Castle, and Ieyasu had no choice but to try to head them off. The advance guards of both armies clashed at the Battle of Hitokotozaka, and the Tokugawa were soundly beaten, causing them to retreat to the relative safety of Hamamatsu, and giving the Takeda a clear path to lay siege to Futamata, which fell shortly afterwards.

    The remains of Futamata Castle.
    CC 表示-継承 3.0, https://commons.wikimedia.org/w/index.php?curid=427661

    In the aftermath of this disaster, still more Tokugawa retainers switched sides and joined the Takeda, and it was assumed that Shingen, whose army, strengthened by defections and reinforcements, now stood at around 30,000 men, would march on Hamamatsu. Instead, the Takeda forces bypassed it entirely. It has been suggested that this was a ploy to lure Ieyasu out of the powerful fortress, giving Shingen the opportunity to destroy him in the open.

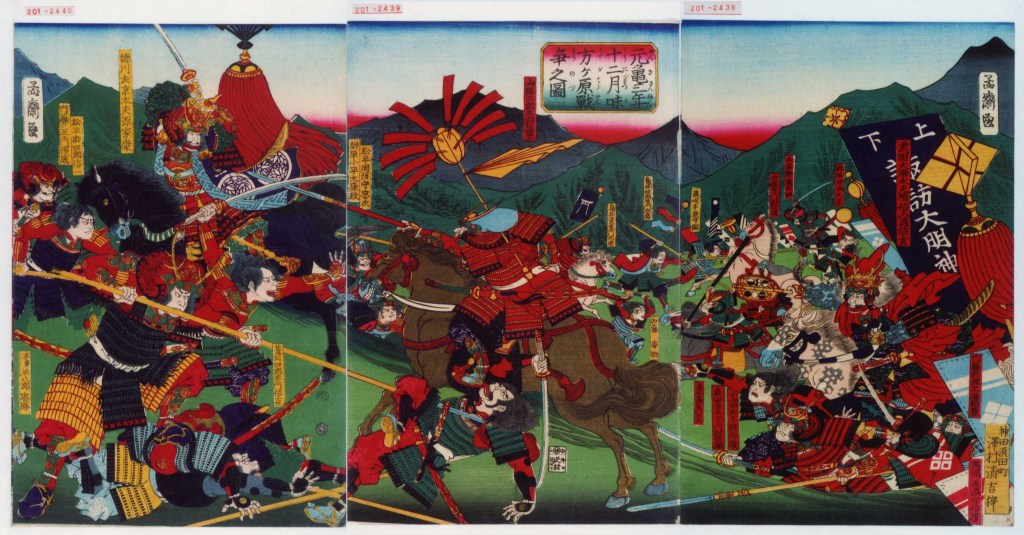
    If that was the plan, it worked, and despite urging from his retainers to remain in Hamamatsu, Ieyasu was emboldened by some long-awaited reinforcements from Nobunaga and decided to march out and intercept the Takeda. The result was the disastrous Battle of Mikatagahara, in which the Tokugawa were decisively defeated, with Ieyasu himself only being saved by the bravery of his retainers, who fought a rearguard action so ferocious that Ieyasu was allowed to escape, and the Takeda were convinced to call off the pursuit.

    A later depiction of the Battle of Mikatagahara

    The winter of 1572 saw the Takeda forces camping deep inside Tokugawa territory, whilst Ieyasu himself was holed up in Hamamatsu, his army scattered, and his prospects looking very bleak.

    A painting of Ieyasu supposedly made after the defeat at Mikatagahara. Traditional history suggests that Ieyasu commissioned the painting as a reminder of the defeat and a warning against future arrogance; however, this account doesn’t appear in any sources before the 20th century and is now generally believed to be apocryphal.

    Sources
    https://ja.wikipedia.org/wiki/%E5%BE%B3%E5%B7%9D%E5%AE%B6%E5%BA%B7
    https://ja.wikipedia.org/wiki/%E4%B8%89%E6%96%B9%E3%83%B6%E5%8E%9F%E3%81%AE%E6%88%A6%E3%81%84
    https://ja.wikipedia.org/wiki/%E4%BA%8C%E4%BF%A3%E5%9F%8E%E3%81%AE%E6%88%A6%E3%81%84
    https://ja.wikipedia.org/wiki/%E4%B8%80%E8%A8%80%E5%9D%82%E3%81%AE%E6%88%A6%E3%81%84
    https://ja.wikipedia.org/wiki/%E8%A5%BF%E4%B8%8A%E4%BD%9C%E6%88%A6
    https://ja.wikipedia.org/wiki/%E9%9D%92%E5%B4%A9%E5%B3%A0
    https://ja.wikipedia.org/wiki/%E9%87%91%E3%83%B6%E5%B4%8E%E3%81%AE%E6%88%A6%E3%81%84
    https://ja.wikipedia.org/wiki/%E5%A7%89%E5%B7%9D%E3%81%AE%E6%88%A6%E3%81%84
    https://ja.wikipedia.org/wiki/%E6%8E%9B%E5%B7%9D%E5%9F%8E
    https://ja.wikipedia.org/wiki/%E6%B5%9C%E6%9D%BE%E5%9F%8E
    https://news.yahoo.co.jp/expert/articles/c8236e8b4e534230da1d01117685da63b98d761a
    https://ja.wikipedia.org/wiki/%E5%B0%8F%E8%B1%86%E5%9D%82%E3%81%AE%E6%88%A6%E3%81%84_(1564%E5%B9%B4)
    https://ja.wikipedia.org/wiki/%E4%B8%89%E6%B2%B3%E4%B8%80%E5%90%91%E4%B8%80%E6%8F%86
    https://ja.wikipedia.org/wiki/%E5%B2%A1%E5%B4%8E%E5%9F%8E
    https://ja.wikipedia.org/wiki/%E6%9C%AC%E5%AE%97%E5%AF%BA

  • Lords of the East, Part 3

    Lords of the East, Part 3

    First post of 2026, so Happy New Year and thanks for sticking with me!

    The situation in 1560. The Hojo are in Green.
    By Alvin Lee – Own work, CC BY-SA 4.0, https://commons.wikimedia.org/w/index.php?curid=39200926

    By 1560, the Hojo were masters of much of the Kanto. A series of successful military campaigns over the previous decades had given them control over much of the area that now comprises modern-day Tokyo, Yokohama, and Chiba. Unlike today, when these areas are among the world’s most densely populated megacities, in the 16th century they were largely agricultural, with a few castle towns surrounded by vast expanses of farmland.

    It is also true that economic productivity, such as it was, was measured in rice production, with land being valued according to predicted rice output, though not necessarily actual output. In short, despite being a period of incredible violence, Japanese society relied almost entirely on rice production to function. Famine was a constant problem, and in 1560, the Hojo, despite controlling vast tracts of land, were experiencing just how bad a failed harvest could be.

    The so-called Eiroku Famine (named after the era) left the Hojo with no food or money, and military operations largely ground to a halt. It was a real blow then, when Uesugi Kenshin, at the head of an army of 8000 men, crossed the mountains in the North of the Kanto and invaded Hojo territory. Though the Uesugi army was relatively small, the Kanto region had been ruled by them for decades prior to the Hojo conquests, and when Kenshin appeared, dozens of local clans switched sides and flocked to the Uesugi banner.

    Uesugi Kenshin.

    Kenshin swept all before him; the Hojo lost castles in Kozuke, Shimosa, and Musashi, and by early 1561, the Uesugi had taken Kamakura. Then, at the head of an army that was reported to be 100,000 strong, Kenshin laid siege to Odawara, the Hojo capital. At this point, the Hojo were in real trouble, but fate was on their side. Ironically, the same famine that had left them seriously weakened now proved to be their saviour. An army of that size needs supplies, and there were few enough to be had in the Kanto, so it wasn’t long before the Uesugi began to melt away.

    The fortress of Odawara was one of the strongest in the realm, and with his army already shrinking, Kenshin faced a difficult choice. A long siege might fatally weaken his army, and even a successful assault could prove hugely costly. Then news arrived that his old enemy, Takeda Shingen, had invaded his home province, at the same time as stirring up a rebellion amongst the Ikko-Ikki, forcing Kenshin to return home post-haste.

    The Hojo had been saved by a combination of good luck and excellent timing on the part of Takeda Shingen, and despite their weakened state, Ujiyasu wasted no time in taking advantage of the reprieve. No sooner had Kenshin returned north than Hojo forces began the process of reconquering their lost territory. Most of the smaller clans that had joined the Uesugi now switched their loyalties back to the Hojo. This was a fairly common practice at the time; there were dozens, if not hundreds, of minor clans all over Japan who could never muster the strength to assert themselves against the power of a Daimyo, so their loyalty often proved to be a fickle thing, prioritising flexibility and survival rather than unquestioned loyalty.

    Takeda Shingen

    Not all the clans welcome the return of the Hojo, however, and Ujiyasu was obliged to dispatch armies to retake several castles in northern Musashi, and he won a decisive victory at the Battle of Mt Ikuno in November 1561, reestablishing the line of control along the mountains in the northern Kanto. Over the next two years, two sides form: a Hojo-Takeda Alliance on one side and a Uesugi-Satomi alliance on the other.

    The Hojo would generally have the better of the fighting in the Kanto, but would prove to be unable to advance further north, whilst the Uesugi would be a constant problem, but would struggle to make advances into the Kanto proper. By 1564, the conflict had largely become a stalemate, so Ujiyasu turned his attention to the East and the Satomi, whom he believed to be a weak link in the alliance.

    Though it might have been true that the Satomi were weaker than the Uesugi, they were no soft touch. When the Hojo crossed the Edogawa River on the way to invading Satomi territory, they were ambushed at the second Battle of Konodai and driven back with heavy losses. You may remember in the last post that the lord of the Satomi, Yoshiaki, had avoided the first Battle of Konodai by correctly identifying the weak position of his allies, retreating with his army intact.

    A later depiction of the area around Konodai.

    At the second battle, however, the command fell to Yoshiaki’s son, Yoshihiro, and he decided to celebrate his victory by distributing wine to his men. A party is a common way to celebrate any success, and the Satomi had successfully driven the Hojo back. The problem was that ‘driven back’ does not mean ‘defeated’; the Hojo regrouped and advanced again in the early hours of the following day.

    The Satomi army, now thoroughly inebriated, was no match for them, and Hojo forces forced the Satomi into a chaotic retreat that didn’t end until the Hojo banner was once again flying over most of Kasuza Province. Shortly after this campaign, Ujiyasu, who had already technically retired as lord of the Hojo in 1559, announced that he had fought his last campaign.

    After this, Ujiyasu seems to have largely limited himself to administration, leaving the business of war to his sons, though he would continue to play an important role in his clan’s future. In 1560, the Imagawa, one part of the triple Takeda-Hojo-Imagawa alliance, had been seriously weakened by the defeat at the Battle of Okehazama in 1560. By 1568, they were on their last legs, and Takeda Shingen, despite being a nominal ally, invaded the Imagawa’s home province of Suruga, aiming to take it for himself.

    Suruga Province
    By Ash_Crow – Own work, based on Image: Provinces of Japan.svg, CC BY 2.5, https://commons.wikimedia.org/w/index.php?curid=1691794

    The Hojo, seeking to support the Imagawa and prevent encirclement by a now hostile Takeda, dispatched an army under Hojo Ujimasa to relieve Suruga. At the same time, Ujiyasu engaged in diplomacy with the Tokugawa Clan, who had lands on the other side of Imagawa territory, and had poor relations with the Takeda. A joint attack by the Hojo and Tokugawa convinced Shingen that holding Suruga was impossible in the short term, and he retreated, with the Hojo moving in and taking large parts of eastern Suruga for themselves.

    Despite this success, the Hojo once again found themselves surrounded on three sides by hostile powers: the Takeda to the West, the Uesugi to the North, and the Satomi to the East. Ujiyasu correctly recognised that if he moved to deal with one threat, the other two would take advantage, and the Hojo did not have the strength for a three-front war. Therefore, he decided to make a formal peace with the Uesugi.

    This was unpopular on both sides because the Uesugi had been enemies of the Hojo more or less from the start, and that kind of bad blood isn’t easily forgotten. However, both sides had bigger problems, namely, Takeda Shingen. Though a ceasefire was agreed upon and the border between the two sides set, the consequences for the Uesugi were that many former allies in the Kanto, like the Satomi, felt betrayed and switched to supporting Takeda Shingen.

    This might not have been such a serious problem for the Hojo, because they were going to have fight the Satomi anyway, but in early 1569, the strategic situation shifted again, when the Takeda and Uesugi made a peace between themselves, meaning that Shingen could now focus his entire strength on the Hojo, whilst also relying on support from the Satomi, and other Kanto clans.

    An image depicting the legendary rivalry between Uesugi Kenshin and Takeda Shingen. Despite this, a peace between the two allowed Shingen to focus on the Hojo.

    Later that year, Shingen invaded Musashi Province and advanced south towards Odawara, the capital of the Hojo. Though they were able to lay siege to the mighty fortress, the chances of taking it were slim. The castle was one of the strongest in the realm, and Ujiyasu had made sure it was as well-defended as possible. Shingen likely understood that taking the castle would have been enormously costly, and he had better uses for his army, so he contented himself with burning the town around Odawara and retreating.

    Ujiyasu ordered his son, Ujimasa, to pursue the retreating Takeda, hoping to trap them before they could return to Kai Province. The plan failed, however, as the Takeda moved faster than expected and the ambush was discovered. At the ensuing Battle of Mimasu Pass, the Takeda successfully fended off the Hojo and returned to Kai.

    Some scholars believe that the whole attempt at Odawara had been an elaborate show of force, meant to impress Shingen’s new allies in the Kanto, or that it was a strategic move to keep the Hojo off balance whilst Takeda forces reinvaded Suruga. Either way, there doesn’t seem to have been much enthusiasm amongst either the Hojo or Takeda to continue the war, and some sources suggest that, shortly before his death, Ujiyasu told his son, Ujimasa, that he should return to a state of peace with the Takeda and make war on their traditional enemy, the Uesugi.

    Hojo Ujimasa

    Ujiyasu himself is supposed to have suffered a stroke in the summer of 1570. Sources from the time speak of him slurring his words or being unable to speak at all, and although he rallied briefly around the New Year in 1571, he would begin to decline again shortly afterwards. There are no official documents bearing his seal after May, and he would eventually pass away in October that year.

    Sources
    https://ja.wikipedia.org/wiki/%E5%8C%97%E6%9D%A1%E6%B0%8F%E6%94%BF
    https://ja.wikipedia.org/wiki/%E5%8C%97%E6%9D%A1%E6%B0%8F%E5%BA%B7
    https://ja.wikipedia.org/wiki/%E5%9B%BD%E5%BA%9C%E5%8F%B0%E5%90%88%E6%88%A6#%E7%AC%AC%E4%BA%8C%E6%AC%A1%E5%9B%BD%E5%BA%9C%E5%8F%B0%E5%90%88%E6%88%A6%EF%BC%88%E6%B0%B8%E7%A6%846%E5%B9%B4%E3%83%BB%E6%B0%B8%E7%A6%847%E5%B9%B4/1563%E5%B9%B4%E3%83%BB1564%E5%B9%B4%EF%BC%89
    https://ja.wikipedia.org/wiki/%E6%AD%A6%E7%94%B0%E4%BF%A1%E7%8E%84
    https://ja.wikipedia.org/wiki/%E4%BB%8A%E5%B7%9D%E7%BE%A9%E5%85%83
    https://ja.wikipedia.org/wiki/%E4%B8%89%E5%A2%97%E5%B3%A0%E3%81%AE%E6%88%A6%E3%81%84
    https://ja.wikipedia.org/wiki/%E5%A4%A7%E5%AE%AE%E5%9F%8E_(%E9%A7%BF%E6%B2%B3%E5%9B%BD)
    https://ja.wikipedia.org/wiki/%E5%B0%8F%E7%94%B0%E5%8E%9F%E5%9F%8E
    https://ja.wikipedia.org/wiki/%E4%B8%8A%E6%9D%89%E8%AC%99%E4%BF%A1
    https://ja.wikipedia.org/wiki/%E9%87%8C%E8%A6%8B%E7%BE%A9%E5%A0%AF
    https://ja.wikipedia.org/wiki/%E6%B1%9F%E6%88%B8%E5%B7%9D
    https://en.wikipedia.org/wiki/Suruga_Province